Color Profiles
In addition to white-balance controls the ISP also supports colour correction via a colour correction matrix (CCM) to compensate colours for various environments and lighting conditions. Bottlenose supports a selection of default colour correction profiles for set lighting conditions and can also support correction via custom CCM.
Changing the Builtin Color Profile
If the colour does not look right, it may be due to the type of lighting used in your office or the trade show.
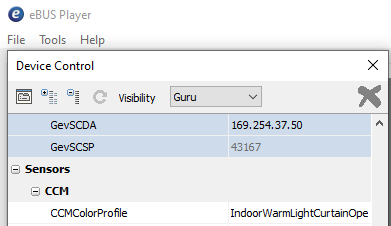
Please change the colour profile Sensors -> CCM -> CCMColorProfile
Python
See the custom CCM setting example below.
ROS2
You can input the same predefined CCM models as seen in eBusPlayer directly via the command line when starting the driver.
ros2 run bottlenose_camera_driver bottlenose_camera_driver_node --ros-args \
  ...
  -p CCMColorProfile:="IndoorWarmLightCurtainOpen"
Custom CCM Setting
Please consider the builtin CCM templates before attempting to customize the CCM. Bottlenose supports a 3x3 CCM. Because the CCM is applied after white-balance controls in Bottlenose, ensure that your custom CCM is configured such that all columns add up to one.
For eBusPlayer and Stereo Viewer set Sensors -> CCM -> CCMColorProfile to Custom. By default, this will enable a unity CCM. Individual coefficients of the 3x3 CCM can be set by setting CCMValueXY where X represents the column index and Y represents the row index of the CCM value.
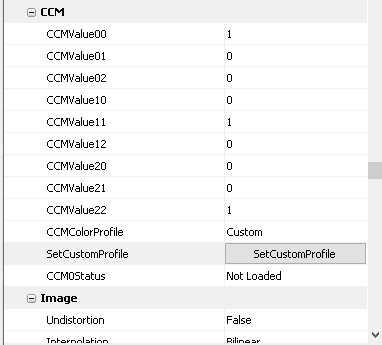
Colour Correction Matrix Coefficients in eBusPlayer
Python
The same controls are exposed on the Python API you can set the CCM Profile and the coefficients as follows.
device_params = device.GetParameters()
profile = device_params.Get("CCMColorProfile")
res = profile.SetValue("Custom")
# set each of the individual coefficients
coeff = device_params.Get("CCMValue00");
res = coeff.SetValue(float)
...
# Apply the command
cmd = device_params.Get("SetCustomProfile");
res = cmd.SetValue(1)
res = cmd.SetValue(0)
# Optional, evaluate CCM0Status to see if the matrix was in an acceptable format
if not res.IsOK():
	# Error handling
ROS2
Custom CCMs can be configured at the start time of the ROS2 driver as follows. The parameter CCMCustom accepts the matrix in row-major, coefficients are separated by , and rows are separated by ;.
ros2 run bottlenose_camera_driver bottlenose_camera_driver_node --ros-args \
  ...
  -p CCMColorProfile:="Custom" \
	-p CCMCustom:="1.29834,-0.32636,-0.0059320;-0.54782,1.64290,-0.23570;0.24949,-0.31654,1.24163"
Custom CCM Calibration
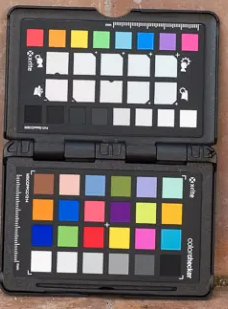
Passport Colour Calibration Target
We refer the user to a colour calibration target such as Passport. Acquire sample images under the following conditions.
- The image is not over or under-exposed, use the auto-exposure function as needed.
- The colour calibration target should be visible in the image (i.e. no omitted colour cells).
- Collect images under target lighting conditions and lens configurations.
- Ensure uniform lighting on the colour target, avoid shadows and specular highlights on the colour target
- Disable auto white-balance controls, set gamma correction to unity (1.0), and set the CCM to unity (see above).
You can use a software suite like Imatest to solve for the corrected colour matrix. Because the CCM is applied post white balance controls in Bottlenose, ensure that your software solves for columns sum to 1. Contact us for support inquiries.
Updated 8 months ago